Every morning and evening, I'm greeted by the most beautiful and eager of faces. I have to say, I'm the highlight of their day. I bring the treats and provide most of the excitement that they experience in each 24 hour period. Their huge dark eyes fix on me while they wait, just out of reach, for their grain.
Alpacas are so stoic that you can't tell something is wrong until it's nearly too late, but just give them the hope of a treat or the promise of a good spraying down on their legs, and the poker faces disappear. They're all eagerness and self-forgetfulness when the good stuff comes out.
Baby face, you've got the cutest little baby face...
Look Mommy! The alpaca is smiling!!
Keeping the "home" in home made. Knitting together friends, old and new. Being content and making the most with what we have. Finding the good in everything we encounter. Creating good where none existed before.
Thursday, September 11, 2008
Monday, September 8, 2008
Saturday, September 6, 2008
Three Babies in One Day!!
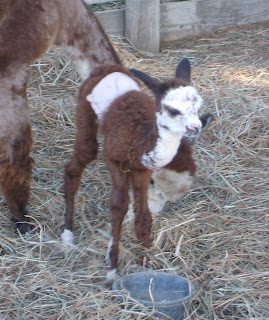
Yes, we had three, count 'em, three, babies in one two hour period today. I got home from town, looked out in the pen and yelled, "We have a baby out there! No,....wait, we have two babies!! Oh my gosh!.....we have three babies!!! All of them were still wet, two were up, one couldn't have been more than 15 minutes old and all the after births were accounted for on the ground.
So here they are! The black is a little male out of our Timothy and Zayne. The big brown one is a boy as well out of Zion and our Taliesin. The little rose gray with the white face is a female out of Miss Rose and Black Knight. The first two are out of completely home bred and home grown stock. Miss Rose and Black Knight have produced three gray females in a row now. This little one has an umbilical hernia so she's wearing a belly band.
And then there's our little Rowdy. Sadly, he lost his mama to a perforated bowel last week. She was such a sweet girl and gave us such a sweet little baby. He's our bottle baby now at the tender age of 2 months, and has just gotten over the shock of losing his mama. He's attached himself to a young maiden of ours, Zakaree, and they're quite the pair. He's an awfully good boy, very vocal and a little confused about all these babies. Today, he thinks Miss Rose is his mama, so he's been tossed into a separate pen for now. Rose's baby needs to get all the colostrum she can get and Rowdy will only deplete the supply. Rose would have taken him, too, if we hadn't interfered. She has some mental challenges and would have abandon her baby in favor of Rowdy.
We have one more female to deliver, our silver gray Eliana, and she's due any day now, if our timing is right. Oh, I just love babies!!
Wednesday, September 3, 2008
School Ramblings...
After 9 years of home school, my oldest daughter started as a freshman at the local public school two weeks ago. I have to say that I miss her terribly. I still have one more at home for school, but I've never been the kind of mom who can't wait to ship the kids off to school in the fall or to camp in the summer. I've enjoyed every one of my children, from the adult boys to my youngest at 11.
Oh, I know she's happy and enjoying herself thoroughly. I know that it was high time to get her out from under my protective wings. I know she'll bloom in the school environment. I know she already has loads of friends and will make more as time goes on. I know, I know, I know,...but the house seems oddly empty without her.
I felt the same way when the boys went to school, but I still had two little ones to keep me busy. It's just different this time. Perhaps it's my age and perhaps it's the anticipation of an empty nest in the not too distant future. Whatever it is, it's hard to have her gone from 7:00 am until 4:30 pm and not be part of what she's doing.
So, wake up mom! I tell myself. She needs to be away from you. She needs to figure some things out on her own. Ssssiiiiiiiggggghhhhhh..... OK. I get it. I don't like it, but I get it. I'll live and I'll get over it eventually.
The youngest has just started school here at home on Tuesday, so we're off and running with that. She's a lovely girl and, being the youngest, has waited all this time to get her mom alone and all to herself. I hope she's not disappointed with what she gets. She's quite the social butterfly, but not very good at thinking for herself in a crowd. She'd be carried along by the popular opinion and the group consensus on what's appropriate behavior and what is not. She would be forever in trouble and it's not worth it to me to lose her at such a young age.
Well, I'm feeling better just for writing this down. I have plenty to keep me busy here until the youngest is old enough for high school. I'd better get focused and get going. I have three concentrated years in which to help fashion a girl into a young woman.
Tuesday, August 19, 2008
Another Addition and a Perfect Sunset
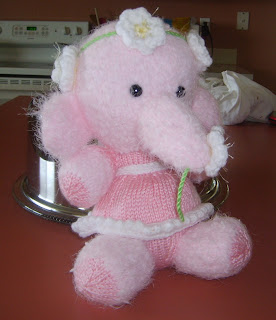
Meet Little Blossom. She's another one of Alan Dart's amazing patterns. I think she's a very nice addition to our growing gang of toys. They're all looking forward to Christmas this year and finding a special little person to love them. See how anxious they look?
The sun went down on a perfect evening last night, leaving a silhouette of the farm countryside. This is just another reason why I love my life here on the farm.
Thursday, August 14, 2008
Scarecrow Sam
Scarecrow Sam is finally finished! Isn't he adorable, and made by my 14 year old daughter!
Here's her next project. It looks like a bowling pin, a gourd, or a rotten summer squash. Actually, it's a gnome in process and knit in the round. We've both gotten the hang of altering flat knitting patterns to knitting in the round. It saves us tons of time and produces a neater finish.
More on the gnome in due time.
Monday, August 11, 2008
Gnome, Ma'am
The latest in the toy craze! This little guy is one of Alan Dart's Yuletide Gnomes. He's made of about 1/3 alpaca and the rest is wool, a bit of acrylic for the face and nose and some of that hairy novelty yarn for the beard. I think he's my favorite so far.
Oh, and here's Sam the Scarecrow, looking a little bit, um, bland at the moment laying on is back, no wait, his front, um, well, we'll have to wait for his face to appear I guess. Bethy is hard at work on him and he should take shape in just a few more days.
Friday, August 8, 2008
Panda, Anyone?
This is the latest addition to the bear population here. He's knitted from black alpaca and white alpaca/mohair blend. The pattern is Jean Greenhowe's teddy bear pattern from Traditional Favorites. I altered the finishing to allow him to be jointed, rather than sewn on one position. I also didn't like the eyes very much--kind of panicked looking, I thought. So, I added a slanted eyelid that softens the stark look of fear to a dreamier and friendlier expression.
I quite like his looks now. He's off to become a gift for a college girl's birthday.
Tuesday, August 5, 2008
Tuesday, July 29, 2008
Knit Along Progress
Here is the first cuff from one of our sock knitters. It's knitted by Kathleen of A Bag of Olives. You go girl! Chances are good that the yarn she's using is hand spun and completely her own, unlike mine, which was Paton's Wool. This qualifies this up and coming pair of socks for a "home spun hand knit" award when they're finished!!
Here is the latest in the ongoing cupcake projects. There was a girl's slumber party here this past weekend and these are Abby's offering for the refreshments. Aren't they adorable?
Saturday, July 26, 2008
Sock KAL-The Toe and Kitchener Stitch
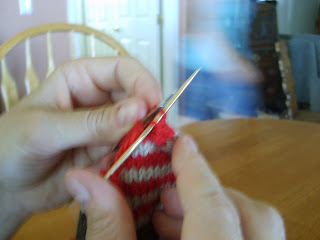
The last task to complete your fabulous socks is upon us. It's time to finish the toe and weave it together for a seamless and perfect ending. You've knitted down the foot until about 2" of length remain. We'll be doing a striped toe in colors B and C, so if you like more color and a longer toe, you can start the stripes well before we begin to decrease. The color stripes pattern is where the clock pattern ends so you can remove your markers.
We're going to change colors at the bottom of the foot where it won't show as much. After you knit one round in the new color, there will be a jog where the first round ends and the second round begins. To minimize this, we're going to reach down into the previous color row and pull a stitch up one row and knit it together with the first stitch of the round. It will look like a slip stitch when finished, being two rows tall. This floating stitch only occurs on the second round after the color change.
Change to color B and knit around.
At the beginning of needle #1, reach down with the tip of your right needle and pick up the right side of the stitch directly below (it will be in color A)...
and put it on your left needle without twisting it.
Knit this stitch and the first st. on #1 together. Knit around.
Change to color C and knit around. Repeat the second round as above, picking up the stitch below in the previous color and knitting it together with the first stitch on needle #1.
The stripe pattern is two rounds wide in each color, unless you want something thinner or wider. Substitute however you like. Floating the first stitch from below always happens on second round (and only the 2nd round) after the color change. If you don't care whether you have a jog in your stripes or not, knit happily around and disregard the directions for addressing this jog.
Next round: Change to color B and knit around.
Next round: Knit (floating the colors st. if you like) and decrease as follows:
#1: k to last 3 sts., k2tog, k1
#2: k1, ssk, k to last 3 sts., k2tog, k1
#3: k1, ssk, k to end.
If the toe were laying flat on the table, the decreases take place one stitch in from the edge on both sides of the toe, top and bottom, so there will be four decreases each round. It helps me to get a visual for this so I don't have to keep looking at the directions.
Next round: Change to color C and knit around.
Next round: Knit a decrease round as above, (floating the color st. if you like)
Continue striping and decreasing on every other round as above until 32 sts. remain, 8 on #1 and #3 each.
Work a decrease round on every round until 16 sts. remain.
Using needle #3, knit across the sts. on needle #1 so that the remaining sts. are held on 2 needles only with 8 on each.
The join with the floated stitch is visible in the photo above, but once it's blocked, it will be much less visible.
Kitchener Stitch
We'll finish the toe by weaving the stitches together using a technique called Kitchener Stitch. I don't know how it got it's title. Basically, Kitchener Stitch reproduces the knit stitches, creating what looks like a continuous knit fabric. There are no seams and it looks for all the world like the knitter knit the toe from back to front without stopping. It's brilliant and very useful in all kinds of garments. Here's how it works:
Cut the working yarn into a long tail (18 in. or more) and thread it onto a tapestry needle. With all of the stitches held on two needles, hold the needles together, one in the front and one in the back with the working yarn tail coming from the back needle.
Set up row: Using the tapestry needle run the yarn through the first stitch in the front as if to purl. Then run the yarn through the first stitch on the back needle as if to knit. Pull snug.
Row one: Slip the first st. of the front needle onto the tapestry needle as if to knit, enter the 2nd st on front needle as if to purl, leaving it one the knitting nee both dle. Pull the yarn through stitches. Snug up yarn, but not tightly.
Slip the first st. on back needle as if to purl. Enter the 2nd st. on back needle as if to knit. Pull yarn through both sts. and snug up the yarn, but not tightly.
Row two up to last row: Repeat as above. There will be one less st. on each needle each repeat until only 2 sts. are left.
Last row: Slip front st. as to knit, slip back st. as to purl. Snug up yarn, weave in end.
Knit, purl, purl, knit. That's how I remember the order. Always slip the first st. off the needle, thread through the second, front and then back. slip knit, purl front. Slip purl, knit back. Once you get the first couple of repeats finished, it all falls into a rhythm.
Woo Hoo! the toe is finished. It may look a little rough in the picture but after blocking, it will look perfect. Now we have to go back to the cuff, sew the edges of the twisted edging together and weave in all of the ends. After that, it's done!!
Try on your sock.
Admire your handiwork.
Start on the second one if you haven't already.
Send me the pictures at woolyworks@odysseyrockranch.com along with your own story and comments or your own blog or web address. If you've got something to share, please send it along and I'll post if for you here and on our website and/or link to your site.
Finally, wear your socks proudly, present them as gifts to only the most important people in your life, or sell them on Etsy.com .
Write your own patterns and dream up your own designs.
Design new and better ways to accomplish knitting tasks.
Write a book.
Become famous!!
What a difference a Sock KAL can make!
We're going to change colors at the bottom of the foot where it won't show as much. After you knit one round in the new color, there will be a jog where the first round ends and the second round begins. To minimize this, we're going to reach down into the previous color row and pull a stitch up one row and knit it together with the first stitch of the round. It will look like a slip stitch when finished, being two rows tall. This floating stitch only occurs on the second round after the color change.
Change to color B and knit around.
At the beginning of needle #1, reach down with the tip of your right needle and pick up the right side of the stitch directly below (it will be in color A)...
and put it on your left needle without twisting it.
Knit this stitch and the first st. on #1 together. Knit around.
Change to color C and knit around. Repeat the second round as above, picking up the stitch below in the previous color and knitting it together with the first stitch on needle #1.
The stripe pattern is two rounds wide in each color, unless you want something thinner or wider. Substitute however you like. Floating the first stitch from below always happens on second round (and only the 2nd round) after the color change. If you don't care whether you have a jog in your stripes or not, knit happily around and disregard the directions for addressing this jog.
Next round: Change to color B and knit around.
Next round: Knit (floating the colors st. if you like) and decrease as follows:
#1: k to last 3 sts., k2tog, k1
#2: k1, ssk, k to last 3 sts., k2tog, k1
#3: k1, ssk, k to end.
If the toe were laying flat on the table, the decreases take place one stitch in from the edge on both sides of the toe, top and bottom, so there will be four decreases each round. It helps me to get a visual for this so I don't have to keep looking at the directions.
Next round: Change to color C and knit around.
Next round: Knit a decrease round as above, (floating the color st. if you like)
Continue striping and decreasing on every other round as above until 32 sts. remain, 8 on #1 and #3 each.
Work a decrease round on every round until 16 sts. remain.
Using needle #3, knit across the sts. on needle #1 so that the remaining sts. are held on 2 needles only with 8 on each.
The join with the floated stitch is visible in the photo above, but once it's blocked, it will be much less visible.
Kitchener Stitch
We'll finish the toe by weaving the stitches together using a technique called Kitchener Stitch. I don't know how it got it's title. Basically, Kitchener Stitch reproduces the knit stitches, creating what looks like a continuous knit fabric. There are no seams and it looks for all the world like the knitter knit the toe from back to front without stopping. It's brilliant and very useful in all kinds of garments. Here's how it works:
Cut the working yarn into a long tail (18 in. or more) and thread it onto a tapestry needle. With all of the stitches held on two needles, hold the needles together, one in the front and one in the back with the working yarn tail coming from the back needle.
Set up row: Using the tapestry needle run the yarn through the first stitch in the front as if to purl. Then run the yarn through the first stitch on the back needle as if to knit. Pull snug.
Row one: Slip the first st. of the front needle onto the tapestry needle as if to knit, enter the 2nd st on front needle as if to purl, leaving it one the knitting nee both dle. Pull the yarn through stitches. Snug up yarn, but not tightly.
Slip the first st. on back needle as if to purl. Enter the 2nd st. on back needle as if to knit. Pull yarn through both sts. and snug up the yarn, but not tightly.
Row two up to last row: Repeat as above. There will be one less st. on each needle each repeat until only 2 sts. are left.
Last row: Slip front st. as to knit, slip back st. as to purl. Snug up yarn, weave in end.
Knit, purl, purl, knit. That's how I remember the order. Always slip the first st. off the needle, thread through the second, front and then back. slip knit, purl front. Slip purl, knit back. Once you get the first couple of repeats finished, it all falls into a rhythm.
Woo Hoo! the toe is finished. It may look a little rough in the picture but after blocking, it will look perfect. Now we have to go back to the cuff, sew the edges of the twisted edging together and weave in all of the ends. After that, it's done!!
Try on your sock.
Admire your handiwork.
Start on the second one if you haven't already.
Send me the pictures at woolyworks@odysseyrockranch.com along with your own story and comments or your own blog or web address. If you've got something to share, please send it along and I'll post if for you here and on our website and/or link to your site.
Finally, wear your socks proudly, present them as gifts to only the most important people in your life, or sell them on Etsy.com .
Write your own patterns and dream up your own designs.
Design new and better ways to accomplish knitting tasks.
Write a book.
Become famous!!
What a difference a Sock KAL can make!
Labels:
decreasing,
kitchener stitch,
knitting,
sock knit along,
socks,
wool,
yarn
Thursday, July 24, 2008
Jack's Rowdy Cowboy and Company
Well, the jury is in on the baby's name. We've decided on.....
Jack's Rowdy Cowboy.
Thanks for all the input. We labored over the name and I hope this is the one that sticks. We've been known to change names all the way up to sending in the registration papers. He's such a character and such a trouble maker that we had to choose something to reflect that. Rebel was very tempting and Lone Star was discussed for quite a while. In fact, every name that was suggested painted a different image for us to consider. It's so much appreciated. There are 9 more babies due in the fall, so we'll need lots more help.
I thought you should have the chance to meet the jury:
Aren't they an intelligent and attentive looking group?
Subscribe to:
Posts (Atom)